Sunday, July 10, 2016

jQuery HTML - Basic concept

According to w3school jQuery contains powerful methods for changing and manipulating HTML elements and attributes.
The more explanation is given by w3school under
Get Content - text(), html(), and val()
Three simple, but useful, jQuery methods for DOM manipulation are:
  1. jQuery - Get Content and Attributes
  2. jQuery - Set Content and Attributes
  3. jQuery - Add Elements
  4. jQuery - Remove Elements
  5. jQuery - Get and Set CSS Classes
  6. jQuery - css() Method
  7. jQuery - Dimensions

1. Get Content - text(), html(), and val()

  1. text() - Sets or returns the text content of selected elements
  2. html() - Sets or returns the content of selected elements (including HTML markup)
  3. val() - Sets or returns the value of form fields
Examples: Note: In the first example we will use all the required code, and after we will only change the code between body tag.

1. text() get content

 <!DOCTYPE html PUBLIC "-//W3C//DTD XHTML 1.0 Transitional//EN" "http://www.w3.org/TR/xhtml1/DTD/xhtml1-transitional.dtd">  
 <html xmlns="http://www.w3.org/1999/xhtml">  
 <head>  
 <meta http-equiv="Content-Type" content="text/html; charset=utf-8" />  
 <title>JQuery Tutorial</title>  
 <script src="https://ajax.googleapis.com/ajax/libs/jquery/1.12.4/jquery.min.js"></script>  
 <link rel="stylesheet" href="https://ajax.googleapis.com/ajax/libs/jqueryui/1.11.4/themes/smoothness/jquery-ui.css">  
 <script src="https://ajax.googleapis.com/ajax/libs/jqueryui/1.11.4/jquery-ui.min.js"></script>  
 </head>  
 <body>  
 <p id="tab" style="width:286px; height:10px; background-color:#3ef8ff; padding:18px; cursor: pointer; text-align:center;">  
 Detail Information  
 </p>  
 <script>  
 $(document).ready(function(){  
      $("#tab").click(function(){  
           alert($("#tab").text());  
 });  
 });  
 </script>  
 </body>  
 </html>  

2. html() get content

 <p id="tab" style="width:286px; height:10px; background-color:#3ef8ff; padding:18px; cursor: pointer; text-align:center;">  
 <b>Detail Information</b>  
 </p>  
 <script>  
 $(document).ready(function(){  
      $("#tab").click(function(){  
           alert($("#tab").html());  
 });  
 });  
 </script>  

3. val() get content

 <p>Name: <input type="text" id="test" value="JQuery"></p>  
 <button>Show Value</button>  
 </script>  

2. Set Content - text(), html(), and val()

Same three method will also be use here
  1. text() - Sets or returns the text content of selected elements
  2. html() - Sets or returns the content of selected elements (including HTML markup)
  3. val() - Sets or returns the value of form fields
Examples: Note: In the first example we will use all the required code, and after we will only change the code between body tag.

1. text() set content

 <!DOCTYPE html PUBLIC "-//W3C//DTD XHTML 1.0 Transitional//EN" "http://www.w3.org/TR/xhtml1/DTD/xhtml1-transitional.dtd">  
 <html xmlns="http://www.w3.org/1999/xhtml">  
 <head>  
 <meta http-equiv="Content-Type" content="text/html; charset=utf-8" />  
 <title>JQuery Tutorial</title>  
 <script src="https://ajax.googleapis.com/ajax/libs/jquery/1.12.4/jquery.min.js"></script>  
 <link rel="stylesheet" href="https://ajax.googleapis.com/ajax/libs/jqueryui/1.11.4/themes/smoothness/jquery-ui.css">  
 <script src="https://ajax.googleapis.com/ajax/libs/jqueryui/1.11.4/jquery-ui.min.js"></script>  
 </head>  
 <body>  
 <p id="tab" style="width:286px; height:10px; background-color:#3ef8ff; padding:18px; cursor: pointer; text-align:center;">  
 Detail Information  
 </p>  
 <script>  
 $(document).ready(function(){  
      $("#tab").click(function(){  
           $("#tab").text("Text will appear after click!");  
 });  
 });  
 </script>  
 </body>  
 </html>  

2. html() set content

 <p id="tab" style="width:286px; height:10px; background-color:#3ef8ff; padding:18px; cursor: pointer; text-align:center;">  
 Detail Information  
 </p>  
 <script>  
 $(document).ready(function(){  
      $("#tab").click(function(){  
           $("#tab").html("<b>Text will appear after click!</b>");  
 });  
 });  
 </script>  

3. val() set content

 <p id="tab" style="width:286px; height:10px; background-color:#3ef8ff; padding:18px; cursor: pointer; text-align:center;">  
 Detail Information  
 </p>  
 <input type="submit" value="Click" id="btn">  
 <script>  
 $(document).ready(function(){  
      $("#btn").click(function(){  
           $("#btn").val('Clicked');  
 });  
 });  
 </script>  

3. jQuery - Add Elements

This concept is used to add new HTML Elements
The more commenly used methods for jQuery Add Elements are four in number
  1. append() - Inserts content at the end of the selected elements
  2. prepend() - Inserts content at the beginning of the selected elements
  3. after() - Inserts content after the selected elements
  4. before() - Inserts content before the selected elements
Examples: Note: In the first example we will use all the required code, and after we will only change the code between body tag.

1. append()

 <p id="tab" style="width:286px; height:10px; background-color:#3ef8ff; padding:18px; cursor: pointer; text-align:center;">  
 <b>Detail Information</b>  
 </p>  
 <script>  
 $(document).ready(function(){  
   $("#tab").click(function(){  
     $("#tab").append("more text appended.");  
   });  
 });  
 </script>  

2. prepend()

 <p id="tab" style="width:286px; height:10px; background-color:#3ef8ff; padding:18px; cursor: pointer; text-align:center;">  
 <b>Detail Information</b>  
 </p>  
 <script>  
 $(document).ready(function(){  
   $("#tab").click(function(){  
     $("#tab").prepend("more text prepened.");  
   });  
 });  
 </script>  

3. after() 

 <p id="tab" style="width:286px; height:10px; background-color:#3ef8ff; padding:18px; cursor: pointer; text-align:center;">  
 <b>Detail Information</b>  
 </p>  
 <script>  
 $(document).ready(function(){  
   $("#tab").click(function(){  
     $("#tab").after("This text will display after the p.");  
   });  
 });  
 </script>  

4. before()

 <p id="tab" style="width:286px; height:10px; background-color:#3ef8ff; padding:18px; cursor: pointer; text-align:center;">  
 <b>Detail Information</b>  
 </p>  
 <script>  
 $(document).ready(function(){  
   $("#tab").click(function(){  
     $("#tab").before("This text will appear before the p");  
   });  
 });  
 </script>  

4. jQuery - Remove Elements

For Removing Elements there is two methods used more commonly.
  1. remove() - Removes the selected element (and its child elements)
  2. empty() - Removes the child elements from the selected element
Examples: Note: In the first example we will use all the required code, and after we will only change the code between body tag.

1. remove()

 <!DOCTYPE html PUBLIC "-//W3C//DTD XHTML 1.0 Transitional//EN" "http://www.w3.org/TR/xhtml1/DTD/xhtml1-transitional.dtd">  
 <html xmlns="http://www.w3.org/1999/xhtml">  
 <head>  
 <meta http-equiv="Content-Type" content="text/html; charset=utf-8" />  
 <title>JQuery Tutorial</title>  
 <script src="https://ajax.googleapis.com/ajax/libs/jquery/1.12.4/jquery.min.js"></script>  
 <link rel="stylesheet" href="https://ajax.googleapis.com/ajax/libs/jqueryui/1.11.4/themes/smoothness/jquery-ui.css">  
 <script src="https://ajax.googleapis.com/ajax/libs/jqueryui/1.11.4/jquery-ui.min.js"></script>  
 </head>  
 <body>  
 <p id="tab" style="width:286px; height:10px; background-color:#3ef8ff; padding:18px; cursor: pointer; text-align:center;">  
 <b>Detail Information</b>  
 </p>  
 <script>  
 $(document).ready(function(){  
   $("#tab").click(function(){  
     $("#tab").remove();  
   });  
 });  
 </script>  
 </body>  
 </html>  

2. empty()

 <p id="tab" style="width:286px; height:10px; background-color:#3ef8ff; padding:18px; cursor: pointer; text-align:center;">  
 <b>Detail Information</b>  
 </p>  
 <script>  
 $(document).ready(function(){  
   $("#tab").click(function(){  
     $("#tab").empty();  
   });  
 });  
 </script>  

5. jQuery - Get and Set CSS Classes

jQuery used many methods for CSS, the most important method that every web designer/developer show keep in mind are four in number
  1. addClass() - Adds one or more classes to the selected elements
  2. removeClass() - Removes one or more classes from the selected elements
  3. toggleClass() - Toggles between adding/removing classes from the selected elements
  4. css() - Sets or returns the style attribute
Examples: Note: In the first example we will use all the required code, and after we will only change the code between body tag.

1. addClass()

 <!DOCTYPE html PUBLIC "-//W3C//DTD XHTML 1.0 Transitional//EN" "http://www.w3.org/TR/xhtml1/DTD/xhtml1-transitional.dtd">  
 <html xmlns="http://www.w3.org/1999/xhtml">  
 <head>  
 <meta http-equiv="Content-Type" content="text/html; charset=utf-8" />  
 <title>JQuery Tutorial</title>  
 <script src="https://ajax.googleapis.com/ajax/libs/jquery/1.12.4/jquery.min.js"></script>  
 <link rel="stylesheet" href="https://ajax.googleapis.com/ajax/libs/jqueryui/1.11.4/themes/smoothness/jquery-ui.css">  
 <script src="https://ajax.googleapis.com/ajax/libs/jqueryui/1.11.4/jquery-ui.min.js"></script>  
 <style>  
 .body {  
      background-color:rgb(103, 250, 255);  
 }  
 .body2{  
      background-color:#ffe758;  
 }  
 </style>  
 </head>  
 <body class="body">  
 <p id="tab" style="width:286px; height:10px; background-color:#3ef8ff; padding:18px; cursor: pointer; text-align:center;">  
 Change background color  
 </p>  
 <script>  
 $(document).ready(function(){  
   $("#tab").click(function(){  
     $("body").addClass("body2");  
   });  
 });  
 </script>  
 </body>  
 </html>  

2. removeClass()

 <!DOCTYPE html PUBLIC "-//W3C//DTD XHTML 1.0 Transitional//EN" "http://www.w3.org/TR/xhtml1/DTD/xhtml1-transitional.dtd">  
 <html xmlns="http://www.w3.org/1999/xhtml">  
 <head>  
 <meta http-equiv="Content-Type" content="text/html; charset=utf-8" />  
 <title>JQuery Tutorial</title>  
 <script src="https://ajax.googleapis.com/ajax/libs/jquery/1.12.4/jquery.min.js"></script>  
 <link rel="stylesheet" href="https://ajax.googleapis.com/ajax/libs/jqueryui/1.11.4/themes/smoothness/jquery-ui.css">  
 <script src="https://ajax.googleapis.com/ajax/libs/jqueryui/1.11.4/jquery-ui.min.js"></script>  
 <style>  
 .body {  
      background-color:rgb(103, 250, 255);  
 }  
 .body2{  
      background-color:#ffe758;  
 }  
 </style>  
 </head>  
 <body class="body">  
 <p id="tab" style="width:286px; height:10px; background-color:#3ef8ff; padding:18px; cursor: pointer; text-align:center;">  
 Change background color  
 </p>  
 <script>  
 $(document).ready(function(){  
   $("#tab").click(function(){  
     $("body").removeClass();  
   });  
 });  
 </script>  
 </body>  
 </html>  

3. toggleClass() 

 <!DOCTYPE html PUBLIC "-//W3C//DTD XHTML 1.0 Transitional//EN" "http://www.w3.org/TR/xhtml1/DTD/xhtml1-transitional.dtd">  
 <html xmlns="http://www.w3.org/1999/xhtml">  
 <head>  
 <meta http-equiv="Content-Type" content="text/html; charset=utf-8" />  
 <title>JQuery Tutorial</title>  
 <script src="https://ajax.googleapis.com/ajax/libs/jquery/1.12.4/jquery.min.js"></script>  
 <link rel="stylesheet" href="https://ajax.googleapis.com/ajax/libs/jqueryui/1.11.4/themes/smoothness/jquery-ui.css">  
 <script src="https://ajax.googleapis.com/ajax/libs/jqueryui/1.11.4/jquery-ui.min.js"></script>  
 <style>  
 .body {  
      background-color:rgb(103, 250, 255);  
 }  
 .body2{  
      background-color:#ffe758;  
 }  
 </style>  
 </head>  
 <body class="body">  
 <p id="tab" style="width:286px; height:10px; background-color:#3ef8ff; padding:18px; cursor: pointer; text-align:center;">  
 Change background color  
 </p>  
 <script>  
 $(document).ready(function(){  
   $("#tab").click(function(){  
     $("body").toggleClass();  
   });  
 });  
 </script>  
 </body>  
 </html>  

4. css()

 <script>  
 $(document).ready(function(){  
   $("button").click(function(){  
     alert("Background color = " + $("p").css("background-color"));  
   });  
 });  
 </script>  
 </head>  
 <body>  
 <h2>This is a heading</h2>  
 <p style="background-color:#ff0000">This is a paragraph.</p>  
 <p style="background-color:#00ff00">This is a paragraph.</p>  
 <p style="background-color:#0000ff">This is a paragraph.</p>  
 <button>Return background-color of p</button>  

6. jQuery - css() Method

The css() method used by jQeury is a powerful method to sets or returns one or more style properties for the selected elements.
Example:
 <!DOCTYPE html PUBLIC "-//W3C//DTD XHTML 1.0 Transitional//EN" "http://www.w3.org/TR/xhtml1/DTD/xhtml1-transitional.dtd">  
 <html xmlns="http://www.w3.org/1999/xhtml">  
 <head>  
 <meta http-equiv="Content-Type" content="text/html; charset=utf-8" />  
 <title>JQuery Tutorial</title>  
 <script src="https://ajax.googleapis.com/ajax/libs/jquery/1.12.4/jquery.min.js"></script>  
 <link rel="stylesheet" href="https://ajax.googleapis.com/ajax/libs/jqueryui/1.11.4/themes/smoothness/jquery-ui.css">  
 <script src="https://ajax.googleapis.com/ajax/libs/jqueryui/1.11.4/jquery-ui.min.js"></script>  
 </head>  
 <body>  
 <p id="p1" style="width:330px; height:10px; background-color:#3ef8ff; padding:18px; cursor: pointer; text-align:center;">  
 Click me to add CSS to the following pharagraph!  
 </p>  
 <p id="p2">This CSS is added by jQuery!</p>  
 <script>  
 $(document).ready(function(){  
   $("#p1").click(function(){  
     $("#p2").css({ "width":"286","height":"10","background-color":"#3ef8ff","padding":"18","text-align":"center"});  
   });  
 });  
 </script>  
 </body>  
 </html>  

7. jQuery - Dimensions

With jQuery, we used some important and powerful methods to handle dimensions of elements and browser window.
There are six commonly used methods which also called jQuery Dimension Methods
  1. width()
  2. height()
  3. innerWidth()
  4. innerHeight()
  5. outerWidth()
  6. outerHeight()

width() & height()

Example:
 <!DOCTYPE html PUBLIC "-//W3C//DTD XHTML 1.0 Transitional//EN" "http://www.w3.org/TR/xhtml1/DTD/xhtml1-transitional.dtd">  
 <html xmlns="http://www.w3.org/1999/xhtml">  
 <head>  
 <meta http-equiv="Content-Type" content="text/html; charset=utf-8" />  
 <title>JQuery Tutorial</title>  
 <script src="https://ajax.googleapis.com/ajax/libs/jquery/1.12.4/jquery.min.js"></script>  
 <link rel="stylesheet" href="https://ajax.googleapis.com/ajax/libs/jqueryui/1.11.4/themes/smoothness/jquery-ui.css">  
 <script src="https://ajax.googleapis.com/ajax/libs/jqueryui/1.11.4/jquery-ui.min.js"></script>  
 <style>  
 #div1 {  
   height: 100px;  
   width: 300px;  
   padding: 10px;  
   margin: 3px;  
   border: 1px solid blue;  
   background-color: lightblue;  
 }  
 </style>  
 </head>  
 <body>  
 <div id="div1"></div>  
 <br>  
 <button>Display dimensions of div</button>  
 <p>width() - returns the width of an element.</p>  
 <p>height() - returns the height of an element.</p>  
 <script>  
 $(document).ready(function(){  
   $("button").click(function(){  
     var txt = "";  
     txt += "Width of div: " + $("#div1").width() + "</br>";  
     txt += "Height of div: " + $("#div1").height();  
     $("#div1").html(txt);  
   });  
 });  
 </script>  
 </body>  
 </html>  

innerWidth() & innerHeight()

Example:
 <div id="div1"></div>  
 <br>  
 <button>Display dimensions of div</button>  
 <p>innerWidth() - returns the width of an element (includes padding).</p>  
 <p>innerHeight() - returns the height of an element (includes padding).</p>  
 <script>  
 $(document).ready(function(){  
   $("button").click(function(){  
     var txt = "";  
     txt += "Width of div: " + $("#div1").width() + "</br>";  
     txt += "Height of div: " + $("#div1").height() + "</br>";  
     txt += "Inner width of div: " + $("#div1").innerWidth() + "</br>";  
     txt += "Inner height of div: " + $("#div1").innerHeight();  
     $("#div1").html(txt);  
   });  
 });  
 </script>  

5. outerWidth() & outerHeight()

Example:
 <!DOCTYPE html PUBLIC "-//W3C//DTD XHTML 1.0 Transitional//EN" "http://www.w3.org/TR/xhtml1/DTD/xhtml1-transitional.dtd">  
 <html xmlns="http://www.w3.org/1999/xhtml">  
 <head>  
 <meta http-equiv="Content-Type" content="text/html; charset=utf-8" />  
 <title>JQuery Tutorial</title>  
 <script src="https://ajax.googleapis.com/ajax/libs/jquery/1.12.4/jquery.min.js"></script>  
 <link rel="stylesheet" href="https://ajax.googleapis.com/ajax/libs/jqueryui/1.11.4/themes/smoothness/jquery-ui.css">  
 <script src="https://ajax.googleapis.com/ajax/libs/jqueryui/1.11.4/jquery-ui.min.js"></script>  
 <style>  
 #div1 {  
   height: 100px;  
   width: 300px;  
   padding: 10px;  
   margin: 3px;  
   border: 1px solid blue;  
   background-color: lightblue;  
 }  
 </style>  
 </head>  
 <body>  
 <div id="div1"></div>  
 <br>  
 <button>Display dimensions of div</button>  
 <p>outerWidth() - returns the width of an element (includes padding and border).</p>  
 <p>outerHeight() - returns the height of an element (includes padding and border).</p>  
 <script>  
 $(document).ready(function(){  
   $("button").click(function(){  
     var txt = "";  
     txt += "Width of div: " + $("#div1").width() + "</br>";  
     txt += "Height of div: " + $("#div1").height() + "</br>";  
     txt += "Outer width of div: " + $("#div1").outerWidth() + "</br>";  
     txt += "Outer height of div: " + $("#div1").outerHeight();  
     $("#div1").html(txt);  
   });  
 });  
 </script>  
 </body>  
 </html>  

More Examples:

 $("button").click(function(){  
   var txt = "";  
   txt += "Outer width (+margin): " + $("#div1").outerWidth(true) + "</br>";  
   txt += "Outer height (+margin): " + $("#div1").outerHeight(true);  
   $("#div1").html(txt);  
 });  

 $("button").click(function(){  
   var txt = "";  
   txt += "Document width/height: " + $(document).width();  
   txt += "x" + $(document).height() + "\n";  
   txt += "Window width/height: " + $(window).width();  
   txt += "x" + $(window).height();  
   alert(txt);  
 });  

 <!DOCTYPE html PUBLIC "-//W3C//DTD XHTML 1.0 Transitional//EN" "http://www.w3.org/TR/xhtml1/DTD/xhtml1-transitional.dtd">  
 <html xmlns="http://www.w3.org/1999/xhtml">  
 <head>  
 <meta http-equiv="Content-Type" content="text/html; charset=utf-8" />  
 <title>JQuery Tutorial</title>  
 <script src="https://ajax.googleapis.com/ajax/libs/jquery/1.12.4/jquery.min.js"></script>  
 <link rel="stylesheet" href="https://ajax.googleapis.com/ajax/libs/jqueryui/1.11.4/themes/smoothness/jquery-ui.css">  
 <script src="https://ajax.googleapis.com/ajax/libs/jqueryui/1.11.4/jquery-ui.min.js"></script>  
 <script>  
 $(document).ready(function(){  
   $("button").click(function(){  
     $("#div1").width(500).height(500);  
   });  
 });  
 </script>  
 <style>  
 #div1 {  
   height: 100px;  
   width: 300px;  
   padding: 10px;  
   margin: 3px;  
   border: 1px solid blue;  
   background-color: lightblue;  
 }  
 </style>  
 </head>  
 <body>  
 <div id="div1"></div>  
 <br>  
 <button>Resize div</button>  
 </body>  
 </html>  

For more detail please visit w3 jQuery

Share:

Saturday, July 9, 2016

7 commonly used jQuery Effects - Basic concept

7 commonly used jQuery Effects 

The most widely used 7 jQuery effect are following!
  1. jQuery hide() and show()
  2. Fading
  3. Sliding
  4. Animation
  5. Stop Animations
  6. Callback Functions
  7. Chaining
Note: Above are the basic Effects, but one other effect which play a very important role is Toggle Effect, which will be discussed throughout this class.

1. jQuery hide() and show()

With jQuery, you can hide and show HTML elements with the hide() and show() methods
Here we will use the following three effects i.e.
  1. hide();
  2. show;
  3. toggle();

hide();

Example: Note in this example I all the required code to include the jQuery. For other examples only inside <body> </body> code will be change. 
 <!DOCTYPE html PUBLIC "-//W3C//DTD XHTML 1.0 Transitional//EN" "http://www.w3.org/TR/xhtml1/DTD/xhtml1-transitional.dtd">  
 <html xmlns="http://www.w3.org/1999/xhtml">  
 <head>  
 <meta http-equiv="Content-Type" content="text/html; charset=utf-8" />  
 <title>JQuery Tutorial</title>  
 <script src="https://ajax.googleapis.com/ajax/libs/jquery/1.12.4/jquery.min.js"></script>  
 <link rel="stylesheet" href="https://ajax.googleapis.com/ajax/libs/jqueryui/1.11.4/themes/smoothness/jquery-ui.css">  
 <script src="https://ajax.googleapis.com/ajax/libs/jqueryui/1.11.4/jquery-ui.min.js"></script>  
 </head>  
 <body>  
 <h2 style="display:none;">The text to be hide or show</h2>  
 <button>Hide</button>  
 <script>  
 $(document).ready(function(){  
      $("button").click(function(){  
           $("h2").hide();  
      });  
 });  
 </script>  
 </body>  
 </html>  

show();

Example: 
 <h2 style="display:none;">The text to be hide or show</h2>  
 <button>Hide</button>  
 <script>  
 $(document).ready(function(){  
      $("button").click(function(){  
           $("h2").show();  
      });  
 });  
 </script>  

toggle();

Example:
 <h2 style="display:none;">The text to be hide or show</h2>  
 <button>Hide</button>  
 <script>  
 $(document).ready(function(){  
      $("button").click(function(){  
           $("h2").toggle();  
      });  
 });  
 </script>  

2. jQuery  Fading Effects

With jQuery you can fade elements in and out of visibility.
  1. fadeIn();
  2. fadeOut();
  3. fadeToggle();
  4. fadeTo();

fadeIn();

Example:
 <div style="width:300px; height:300px; background-color:#3ef8ff; margin:10px; padding:10px; display:none;">  
 <h2>The text to be hide or show</h2>  
 </div>  
 <button id="btn1">FadeIn</button>  
 <button id="btn2">FadeIn Slow</button>  
 <button id="btn3">FadeIn 3000 </button>  
 <script>  
 $(document).ready(function(){  
      $("#btn1").click(function(){  
           $("div").fadeIn();  
      });  
 });  
 $(document).ready(function(){  
      $("#btn2").click(function(){  
           $("div").fadeIn("slow");  
      });  
 });  
 $(document).ready(function(){  
      $("#btn3").click(function(){  
           $("div").fadeIn(3000);  
      });  
 });  
 </script>  

fadeOut();

Example:
 <div style="width:300px; height:300px; background-color:#3ef8ff; margin:10px; padding:10px;">  
 <h2>The text to be hide or show</h2>  
 </div>  
 <button id="btn1">FadeOut</button>  
 <button id="btn2">FadeOut Slow</button>  
 <button id="btn3">FadeOut 3000 </button>  
 <script>  
 $(document).ready(function(){  
      $("#btn1").click(function(){  
           $("div").fadeOut();  
      });  
 });  
 $(document).ready(function(){  
      $("#btn2").click(function(){  
           $("div").fadeOut("slow");  
      });  
 });  
 $(document).ready(function(){  
      $("#btn3").click(function(){  
           $("div").fadeOut(3000);  
      });  
 });  
 </script>  

fadeToggle();

Example:
 <div style="width:300px; height:300px; background-color:#3ef8ff; margin:10px; padding:10px;">  
 <h2>The text to be hide or show</h2>  
 </div>  
 <button id="btn1">Hide/Shaw</button>  
 <button id="btn2">Hide/Shaw Slow</button>  
 <button id="btn3">Hide/Shaw 3000 </button>  
 <script>  
 $(document).ready(function(){  
      $("#btn1").click(function(){  
           $("div").fadeToggle();  
      });  
 });  
 $(document).ready(function(){  
      $("#btn2").click(function(){  
           $("div").fadeToggle("slow");  
      });  
 });  
 $(document).ready(function(){  
      $("#btn3").click(function(){  
           $("div").fadeToggle(3000);  
      });  
 });  
 </script>  

fadeTo();

Example:
 <div style="width:300px; height:300px; background-color:#3ef8ff; margin:10px; padding:10px;">  
 <h2>The text to be hide or show</h2>  
 </div>  
 <button id="btn2">Hide/Shaw To Slow</button>  
 <button id="btn3">Hide/Shaw To 3000 to 0.2 </button>  
 <script>  
 $(document).ready(function(){  
      $("#btn2").click(function(){  
           $("div").fadeTo("slow", 0.5);  
      });  
 });  
 $(document).ready(function(){  
      $("#btn3").click(function(){  
           $("div").fadeTo(3000, 0.2);  
      });  
 });  
 </script>  

3. jQuery Sliding Effects

With jQuery you can create a sliding effect on elements.
  1. slideDown();
  2. slideUp();
  3. slideToggle();

slideDown();

Example:
 <p id="tab" style="width:286px; height:10px; background-color:#3ef8ff; padding:18px; margin:0px; cursor: pointer; text-align:center;">  
 Detail Information  
 </p>  
 <p id="detail" style="width:300px; height:300px; background-color:#3ef8ff; padding:10px; margin-top:0px; border:1px solid #0a7175; display:none;">  
 Detail information is given. Detail information is given. Detail information is given. Detail information is given.  
 </p>  
 <script>  
 $(document).ready(function(){  
      $("#tab").click(function(){  
           $("#detail").slideDown();  
      })  
 });  
 </script>  
Note: other parameters for SlideDown(); method are
 $("#detail").slideDown("slow");  
AND
 $("#detail").slideDown(2000);  

slideUp();

Example:
 <p id="tab" style="width:286px; height:10px; background-color:#3ef8ff; padding:18px; margin:0px; cursor: pointer; text-align:center;">  
 Detail Information  
 </p>  
 <p id="detail" style="width:300px; height:300px; background-color:#3ef8ff; padding:10px; margin-top:0px; border:1px solid #0a7175;">  
 Detail information is given. Detail information is given. Detail information is given. Detail information is given.  
 </p>  
 <script>  
 $(document).ready(function(){  
      $("#tab").click(function(){  
           $("#detail").slideUp();  
      })  
 });  
 </script>  
Note: other parameters for SlideUp(); method are
 $("#detail").slideUp("slow");  
AND
 $("#detail").slideUp(300);  

slideToggle();

Example:
 <body>  
 <p id="tab" style="width:286px; height:10px; background-color:#3ef8ff; padding:18px; margin:0px; cursor: pointer; text-align:center;">  
 Detail Information  
 </p>  
 <p id="detail" style="width:300px; height:300px; background-color:#3ef8ff; padding:10px; margin-top:0px; border:1px solid #0a7175; display:none;">  
 Detail information is given. Detail information is given. Detail information is given. Detail information is given.  
 </p>  
 <script>  
 $(document).ready(function(){  
      $("#tab").click(function(){  
           $("#detail").slideToggle();  
      })  
 });  
 </script>  
Note: other parameters for SlideToggle(); method are
 $("#detail").slideToggle("slow");  
AND
 $("#detail").slideToggle(2000);  

4. jQuery Effects - Animation

The jQuery animate() method is used to create custom animations.
  1. animate();

animate();

Example:
 <body>  
 <p id="tab" style="width:286px; height:10px; background-color:#3ef8ff; padding:18px; cursor: pointer; text-align:center;">  
 Click to animate!  
 </p>  
 <p id="detail" style="width:300px; height:300px; background-color:#3ef8ff; padding:10px; border:1px solid #0a7175; position: absolute;">  
 Detail information is given. Detail information is given.  
 </p>  
 <script>  
 $(document).ready(function(){  
      $("#tab").click(function(){  
           $("#detail").animate({left:"400px", width:"100px", height:"100px"});  
      })  
 });  
 </script>  

5. jQuery Stop

The jQuery stop() method is used to stop animations or effects before it is finished.
  1. stop();

stop();

Example:
 Stop  
 </p>  
 <p id="tab" style="width:286px; height:10px; background-color:#3ef8ff; padding:18px; margin:0px; cursor: pointer; text-align:center;">  
 Detail Information  
 </p>  
 <p id="detail" style="width:300px; height:300px; background-color:#3ef8ff; padding:10px; margin-top:0px; border:1px solid #0a7175; display:none;">  
 Detail information is given. Detail information is given. Detail information is given. Detail information is given.  
 </p>  
 <script>  
 $(document).ready(function(){  
      $("#tab").click(function(){  
           $("#detail").slideToggle(3000);  
      })  
      $("#tab2").click(function(){  
           $("#detail").stop();  
      })  
 });  
 </script>  

6. jQuery Callback Functions

A callback function is executed after the current effect is 100% finished.
Typical syntax: $(selector).hide(speed,callback);
 <p id="tab" style="width:286px; height:10px; background-color:#3ef8ff; padding:18px; cursor: pointer; text-align:center;">  
 Detail Information  
 </p>  
 <p id="detail" style="width:300px; height:300px; background-color:#3ef8ff; padding:10px; border:1px solid #0a7175;">  
 Detail information is given. Detail information is given. Detail information is given. Detail information is given.  
 </p>  
 <script>  
 $(document).ready(function(){  
      $("#tab").click(function(){  
           $("#detail").hide("slow", function(){  
                document.alert("The text is gone");  
           });  
      })  
 });  
 </script>  

7. jQuery - Chaining

With jQuery, you can chain together actions/methods.
 <p id="tab" style="width:286px; height:10px; background-color:#3ef8ff; padding:18px; cursor: pointer; text-align:center;">  
 Detail Information  
 </p>  
 <p id="detail" style="width:300px; height:300px; background-color:#3ef8ff; padding:10px; border:1px solid #0a7175;">  
 Detail information is given. Detail information is given. Detail information is given. Detail information is given.  
 </p>  
 <script>  
 $(document).ready(function(){  
      $("#tab").click(function(){  
           $("#detail").css("color", "red").slideUp(2000).slideDown(2000);  
 });  
 });  
 </script>  


Share:

Wednesday, July 6, 2016

How to use jQeury? Basic concept

What is jQeury?

According to W3School “jQuery is a lightweight, "write less, do more", JavaScript library”

What is  the purpose of jQuery?

Jquery is used to make it much easy to use JavaScripts, in website. Normaly it is very hard to use JavaScript, and jQuery make it easy for us.

What you should Already know?

Before you start studying jQuery, you should have a basic knowledge of:
  1. HTML
  2. CSS
  3. JavaScript
jQuery Features:
We can use jQeury with following
  1. HTML/DOM manipulation
  2. CSS manipulation
  3. HTML event methods
  4. Effects and animations
  5. AJAX
  6. Utilities

How to use jQuery?

    You can download Jquery and add it to your website.
     <head>  
 <script src="jquery-1.12.4.min.js"></script>  
 </head>  
Download jQuery http://jquery.com/

You can use jQeury CDN
 <head>  
 <script src="https://ajax.googleapis.com/ajax/libs/jquery/1.12.4/jquery.min.js">  
 </script>  
 </head>  
Note: We can find the about code by using the following link
jQury link:
Code to add
 <script src="https://ajax.googleapis.com/ajax/libs/jquery/1.12.4/jquery.min.js">  
 </script>  
jQuery UI link:
Code to add
 <link rel="stylesheet" href="https://ajax.googleapis.com/ajax/libs/jqueryui/1.11.4/themes/smoothness/jquery-ui.css">  
 <script src="https://ajax.googleapis.com/ajax/libs/jqueryui/1.11.4/jquery-ui.min.js"></script>  
jQuery Mobile link
Code to add
 <link rel="stylesheet" href="https://ajax.googleapis.com/ajax/libs/jquerymobile/1.4.5/jquery.mobile.min.css">  
 <script src="https://ajax.googleapis.com/ajax/libs/jquerymobile/1.4.5/jquery.mobile.min.js"></script>  

jQuery Syntax

According to w3School “The jQuery syntax is tailor-made for selecting HTML elements and performing some action on the element(s).
Basic syntax is: $(selector).action()
  1. A $ sign to define/access jQuery
  2. A (selector) to "query (or find)" HTML elements
  3. A jQuery action() to be performed on the element(s)

The Document Ready Event

 $(document).ready(function(){  
   // jQuery methods go here...  
 });  

jQuery Selectors


jQuery selectors allow you to select and manipulate HTML element(s).
$("*")
Selects all elements
$(this)
Selects the current HTML element
$("p.classname or #id")
Selects all <p> elements with class="intro"
$("p:first")
Selects the first <p> element
$("ul li:first")
Selects the first <li> element of the first <ul>
$("ul li:first-child")
Selects the first <li> element of every <ul>
$("[href]")
Selects all elements with an href attribute
$("a[target='_blank']")
Selects all <a> elements with a target attribute value equal to "_blank"
$("a[target!='_blank']")
Selects all <a> elements with a target attribute value NOT equal to "_blank"
$(":button")
Selects all <button> elements and <input> elements of type="button"
$("tr:even")
Selects all even <tr> elements
$("tr:odd")
Selects all odd <tr> elements

What are Events?

All the different visitor's actions that a web page can respond to are called events.
An event represents the precise moment when something happens.
Examples:
  1. moving a mouse over an element
  2. selecting a radio button
  3. clicking on an element

jQuery Syntax For Event Methods

 $("p").click();  
Mouse Events
Keyboard Events
Form Events
Document/Window Events
click
keypress
submit
load
dblclick
keydown
change
resize
mouseenter
keyup
focus
scroll
mouseleave

blur
Unload

Exapmple 1:

 <!DOCTYPE html PUBLIC "-//W3C//DTD XHTML 1.0 Transitional//EN" "http://www.w3.org/TR/xhtml1/DTD/xhtml1-transitional.dtd">  
 <html xmlns="http://www.w3.org/1999/xhtml">  
 <head>  
 <meta http-equiv="Content-Type" content="text/html; charset=utf-8" />  
 <title>JQuery Tutorial</title>  
 <script src="https://ajax.googleapis.com/ajax/libs/jquery/1.12.4/jquery.min.js"></script>  
 <link rel="stylesheet" href="https://ajax.googleapis.com/ajax/libs/jqueryui/1.11.4/themes/smoothness/jquery-ui.css">  
 <script src="https://ajax.googleapis.com/ajax/libs/jqueryui/1.11.4/jquery-ui.min.js"></script>  
 </head>  
 <body>  
 <p id="line1">Hello everyboday from line one!</p>  
 <p id="line2">Hello everyboday from line two!</p>  
 <p id="line3">Hello everyboday from line three!</p>  
 <p id="line4" class="line-class4">Hello everyboday from line four!</p>  
 <ul>  
 <li>list item one</li>  
 <li>list item two</li>  
 <li>list item three</li>  
 <li>list item four</li>  
 </ul>  
 <a href="www.google.com" target="_blank">Google</a><br /><br />  
 <a href="www.yahoo.com">Yahoo</a><br /><br />  
 <table border="2" width="500">  
 <tr>  
 <td>1</td>  
 <td>2</td>  
 <td>3</td>  
 </tr>  
 <tr>  
 <td>4</td>  
 <td>5</td>  
 <td>6</td>  
 </tr>  
 </table>  
 <br /><br />  
 <button type="button">Click</button>  
 <script>  
 $(document). ready(function(){  
         $("button "). click(function(){  
                 $(“*”).hide();  
                 });  
         });  
 </script>  
 </body>  
 </html>  
Result: If you click on the button everything will be hide

Example 2:

Keep all the code as the same and change the <script></script>
 <script>  
 $(document). ready(function(){  
         $("button "). click(function(){  
                 $(this).hide();  
                 });  
         });  
 </script>  
Result: The butto disaper

Example 3:

Selecing Class or ID
 <script>  
 $(document). ready(function(){  
         $("button"). click(function(){  
                 $("p#line1").hide();  
                 });  
         });  
 </script>  
 <script>  
 $(document). ready(function(){  
         $("button"). click(function(){  
                 $("p.line-class4").hide();  
                 });  
         });  
 </script>  

Example 4:

 <script>  
 $(document). ready(function(){  
         $("button"). click(function(){  
                 $("p:last").hide();  
                 });  
         });  
 </script>  
 Or  
 <script>  
 $(document). ready(function(){  
         $("button"). click(function(){  
                 $("p:last").hide();  
                 });  
         });  
 </script>  
The first /second pharagraph will be hide

Example 5:

 <script>  
 $(document). ready(function(){  
         $("button"). click(function(){  
                 $("ul li:first").hide();  
                 });  
         });  
 </script>  
 Or  
 <script>  
 $(document). ready(function(){  
         $("button"). click(function(){  
                 $("ul li:first-child").hide();  
                 });  
         });  
 </script>  
Note – by this way we can select the ul – li elements

Example 6:

 <script>  
 $(document). ready(function(){  
         $("button"). click(function(){  
                 $("[href]").hide("color:red");  
                 });  
         });  
 </script>  
 This will target the all href elements.  
 Or  
 <script>  
 $(document). ready(function(){  
         $("button"). click(function(){  
                 $("a[target='_blank']").hide("color:red");  
                 });  
         });  
 </script>  
Target particular element i.e. _blank and you can also target in reverse form i.e.
 <script>  
 $(document). ready(function(){  
         $("button"). click(function(){  
                 $("a[target!='_blank']").hide("color:red");  
                 });  
         });  
 </script>  

Example 7:

 <script>  
 $(document). ready(function(){  
         $("button"). click(function(){  
                 $(":button").hide("color:red");  
                 });  
         });  
 </script>  
Selecting button and button input elements

Example 8:

 <script>  
 $(document).ready(function(){  
         $("tr:even").css("background-color", "#ff6600");  
         });  
 $(document).ready(function(){  
         $("tr:odd").css("background-color", "#dddddd");  
         });  
 $(document). ready(function(){  
         $("button"). click(function(){  
                 $("tr:even").hide("color:red");  
                 });  
         });  
 </script>  

Other Example for Events:

 <script>  
 $(document).ready(function(){  
         $("tr:even").css("background-color", "#ff6600");  
         });  
 $(document).ready(function(){  
         $("tr:odd").css("background-color", "#dddddd");  
         });  
 $(document). ready(function(){  
         $("button"). dblclick(function(){  
                 $("tr:even").hide("color:red");  
                 });  
         });  
 </script>  
Or
 <script>  
 $(document).ready(function(){  
         $("tr:even").css("background-color", "#ff6600");  
         });  
 $(document).ready(function(){  
         $("tr:odd").css("background-color", "#dddddd");  
         });  
 $(document). ready(function(){  
         $("button"). mouseenter(function(){  
                 $("tr:even").hide("color:red");  
                 });  
         });  
 </script>  
Or
 <script>  
 $(document).ready(function(){  
         $("tr:even").css("background-color", "#ff6600");  
         });  
 $(document).ready(function(){  
         $("tr:odd").css("background-color", "#dddddd");  
         });  
 $(document). ready(function(){  
         $("button"). mouseleave(function(){  
                 $("tr:even").hide("color:red");  
                 });  
         });  
 </script>  

Share:

Monday, July 4, 2016

How to use Font Awesome in you Design

How to use Font Awesome in you Design?

This post is about how we can use the Font Awesome in our design. Now a day the technology get change. If you want any training video we do not know how we can implement it.
This post will help you in that case.
If you want to use the Font-Awesome here is the simple Example.
1. Fist thing that you need is to include the BootstrapCDN for FontAwesome  in the <head> tag of you HTML page i.e.
 <head>  
 <link href="https://maxcdn.bootstrapcdn.com/font-awesome/4.6.3/css/font-awesome.min.css" rel="stylesheet" integrity="sha384-T8Gy5hrqNKT+hzMclPo118YTQO6cYprQmhrYwIiQ/3axmI1hQomh7Ud2hPOy8SP1" crossorigin="anonymous">  
 </head>  
After that the FontAwesome CDN will start working on you HTML page. 
Then you need to add the element to your HTML page, where you want to display the FontAwesome on your page.
For Example we used here the <p1></p1> to display the FontAwesome on our HTML page. <p1></p1> is the elements. We can also use <element></element> or anything text you want.
Then you can display it with your CSS, for example here if the elements are <p1></p1> then by CSS we can display it by following CSS come.
 .p1 {  
   position: relative;  
 }  
 /*replace the content value with the  
 corresponding value from the list below*/  
 .p1:before {  
   content: "\f000";  
   font-family: FontAwesome;  
   font-style: normal;  
   font-weight: normal;  
   text-decoration: inherit;  
 /*--adjust as necessary--*/  
   color: #000;  
   font-size: 18px;  
   padding-right: 0.5em;  
   position: absolute;  
   top: 10px;  
   left: 0;  
 }  
In my case you can use it like that
 p1 {  
  position:relative;  
  }  
  p1:before {  
  font-family:FontAwesome;  
  content: "\f009";  
  text-align:center;  
  font-size:100px;  
  display:block;  
   }  

By this way the Font Awesome will work correctly.
Share:

Thursday, June 23, 2016

How to speed up WordPress Website?

How to speed up WordPress Website?

Here I will share with you guys my experience about How to speed up WordPress website. In the beginning it was quite difficult for me to make it possible, but after searching on internet I fount that if some one follow step by step right procedure then he/she can improve the WordPress website speed. 
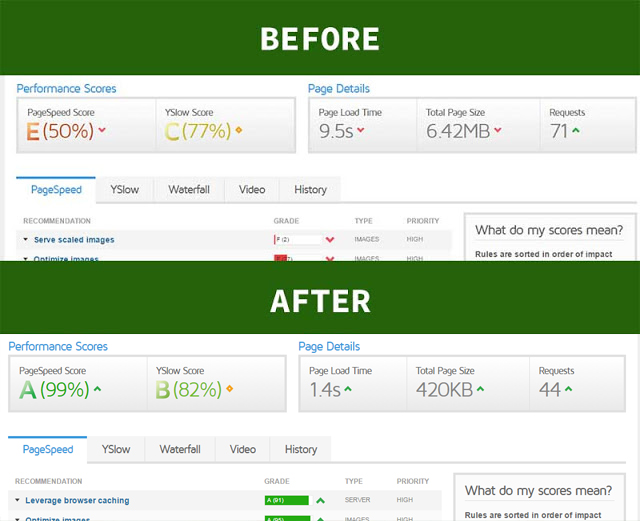
As you can seed the above screenshots, it was totally exiting and amazing when I personally saw the correct result.

1. Resize all images

Resize all images specially those images which display on the main page. You can use Adobe Photoshop for that. If you do not have Adobe Photoshop install you can use some image editing online tool for example the one which I use personally is 
When you finished with resizing all your images then before upload it to the media, make sure that to optimize all those images.

2. Optimize - Compress Images 

You must to compress all your images i.e. Optimize all your images after resizing it. I personally used the one online very good tool that gives me very good result. click on the follow link

Compress JPEG Images Online

3. Install and configure W3 total cache

According to W3 total cache developer, W3 total cache is useful for 
Easy Web Performance Optimization (WPO) using caching: browser, page, object, database, minify and content delivery network support.
Click on the following image to download the W3 total cache plugin

 W3 Total Cache

 How to customize the W3 total cache please following the instruction in the given article
Click here to see the W3 total cache customizaion

4. How to Remove query strings from static resources

If you Use "W3 Total Cache" - W3TC you may switch off "Prevent caching of objects after settings change" in Browser Cache.
This removes query strings from static resources.

5. EWWW Image Optimizer

Install and configure EWWW Image Optimizer plugin, click on the following to download the EWWW Image Optimizer
Click here to download EWWW Image Optimizer

6. GZip Ninja Speed Compression — WordPress Plugins

Install and configure GZip Ninja Speed Compression — WordPress Plugins, which is used for according to plugin developers.
 Is your website GZipped? Need faster, reliable data transfer to rank higher in Google? Have you been told your website is slow? Then use this!
Note:  For number 5 and 6 keep the default settings.

7. W3 total cache plugin - Performance - Extensions 

If you click on Performance - Extensions you will see few plugin that must be install and activated.
1. CloudFlare
2. FeedBurner
3. Genesis Framework
4. WordPress SEO by Yoast

8. Add Expires headers

This does not require a plugin to handle the expires headers (but use one for serving cached files and set the garbage collection to two weeks)
You can do this by add the following code to the .htaccess file.
 <IfModule mod_expires.c>  
   ExpiresActive on  
   ExpiresByType text/css "access plus 60 days"  
   ExpiresByType text/javascript "access plus 60 days"  
   ExpiresByType image/ico "access plus 60 days"  
   ExpiresByType image/jpg "access plus 60 days"  
   ExpiresByType image/jpeg "access plus 60 days"  
   ExpiresByType image/gif "access plus 60 days"  
   ExpiresByType image/png "access plus 60 days"  
   ExpiresByType text/css "access plus 60 days"  
   ExpiresByType text/html "access plus 60 days"  
 </IfModule>  

According to W3 Total Cache plugin a complete pack of expires headers as follows:

 <IfModule mod_expires.c>  
   ExpiresActive On  
   ExpiresByType text/css A31536000  
   ExpiresByType application/x-javascript A31536000  
   ExpiresByType text/x-component A31536000  
   ExpiresByType text/html A3600  
   ExpiresByType text/richtext A3600  
   ExpiresByType image/svg+xml A3600  
   ExpiresByType text/plain A3600  
   ExpiresByType text/xsd A3600  
   ExpiresByType text/xsl A3600  
   ExpiresByType text/xml A3600  
   ExpiresByType video/asf A31536000  
   ExpiresByType video/avi A31536000  
   ExpiresByType image/bmp A31536000  
   ExpiresByType application/java A31536000  
   ExpiresByType video/divx A31536000  
   ExpiresByType application/msword A31536000  
   ExpiresByType application/vnd.ms-fontobject A31536000  
   ExpiresByType application/x-msdownload A31536000  
   ExpiresByType image/gif A31536000  
   ExpiresByType application/x-gzip A31536000  
   ExpiresByType image/x-icon A31536000  
   ExpiresByType image/jpeg A31536000  
   ExpiresByType application/vnd.ms-access A31536000  
   ExpiresByType audio/midi A31536000  
   ExpiresByType video/quicktime A31536000  
   ExpiresByType audio/mpeg A31536000  
   ExpiresByType video/mp4 A31536000  
   ExpiresByType video/mpeg A31536000  
   ExpiresByType application/vnd.ms-project A31536000  
   ExpiresByType application/x-font-otf A31536000  
   ExpiresByType application/vnd.oasis.opendocument.database A31536000  
   ExpiresByType application/vnd.oasis.opendocument.chart A31536000  
   ExpiresByType application/vnd.oasis.opendocument.formula A31536000  
   ExpiresByType application/vnd.oasis.opendocument.graphics A31536000  
   ExpiresByType application/vnd.oasis.opendocument.presentation A31536000  
   ExpiresByType application/vnd.oasis.opendocument.spreadsheet A31536000  
   ExpiresByType application/vnd.oasis.opendocument.text A31536000  
   ExpiresByType audio/ogg A31536000  
   ExpiresByType application/pdf A31536000  
   ExpiresByType image/png A31536000  
   ExpiresByType application/vnd.ms-powerpoint A31536000  
   ExpiresByType audio/x-realaudio A31536000  
   ExpiresByType image/svg+xml A31536000  
   ExpiresByType application/x-shockwave-flash A31536000  
   ExpiresByType application/x-tar A31536000  
   ExpiresByType image/tiff A31536000  
   ExpiresByType application/x-font-ttf A31536000  
   ExpiresByType audio/wav A31536000  
   ExpiresByType audio/wma A31536000  
   ExpiresByType application/vnd.ms-write A31536000  
   ExpiresByType application/vnd.ms-excel A31536000  
   ExpiresByType application/zip A31536000  
 </IfModule>  
Note: You can change the time

9. Specify image dimensions

What is mean by that?
It means images beeing only resized, but they aren't cropped. That would make your site faster. Instead of loading big image size only to show, lets say 50x50, will make your site load slow. You can add custom image sizes in function.php, and change code in areas that you are using images.
That will need some work, to sort it out.
How to fix that? Yes You can fix this by adding the following code in functions.php
 <?php  
 add_image_size( 'thumbnail-new', 220, 180, true );  
 add_image_size( 'thumb', 600, 350, true );  
 add_image_size( 'thumbnil', 600, 350, true );  
 add_image_size( 'medium', 600, 350, true );  
 add_image_size( 'large', 600, 350, true );  
 add_image_size( 'post-thumbnail', 600, 350, true );  
 add_image_size( '{custom-image-type}', 600, 350, true );  
 function _remove_script_version( $src ){  
 $parts = explode( '?', $src );  
 return $parts[0];  
 }  
 add_filter( 'script_loader_src', '_remove_script_version', 15, 1 );  
 add_filter( 'style_loader_src', '_remove_script_version', 15, 1 );  
 ?>  

10. Enable Keep-Alive

How to Enable Keep Alive? We can do this by htaccess. Access the .htaccess file wich you can find in the root folder of you WordPress Install, which you can access via FTP.
This is the code that you will need to paste in the .htaccess file in order to enable Keep Alive:
 <IfModule mod_headers.c>  
 Header set Connection keep-alive  
 </IfModule>  
Now, you should paste the code directly below "#END WordPress" Please be sure to paste it only  after this line or you WILL break  your website which will return a 500 server error.

Result after all this


Share:

Contact Form

Name

Email *

Message *